
Monday, July 9, 2012
Love & Sympathy
Real quick post today. I'm off for the hay field. Sorry to say, but sometimes I need a sympathy card.


Friday, July 6, 2012
Everything Eleanor
Hope everyone had a wonderful 4th of July. I think I'm still recuperating. Our church had lunch at the park and games for the kids to play. It takes a lot of preparation and hard work by many to pull this off. Needless to say, with the weather being so hot and the 4th landing on a Wednesday, the crowd wasn't there. We were lucky to break even. We do have a lot of leftover bars and pop that we will be able to share with the congregation this Sunday. It was a great community service for our youth.
On to stamping . . . only one card to share with you right now. Still enjoying the Trust God text stamp set and the Everything Eleanor stamp set. Lately my cards have to be simple with what little time I've had in my stamp room. I used two different colors for the flowers and the yellow flower has Crystal Effects with a touch of Dazzling Diamonds on it.


I've been working in the hayfield, leaving the house at 9:00 a.m. and getting back home around 8:00 p.m. This morning I got to stay home, but will need to take dinner to the field. I'll do my best to get some other things posted. I have another bridal shower gift to make by Sunday so I will need to get that going pretty soon. It gives me something to think about on the tractor. Hope everyone is staying cool. There sure has been several hot days lately. Sounds like we might have a little break coming soon. Take care!
On to stamping . . . only one card to share with you right now. Still enjoying the Trust God text stamp set and the Everything Eleanor stamp set. Lately my cards have to be simple with what little time I've had in my stamp room. I used two different colors for the flowers and the yellow flower has Crystal Effects with a touch of Dazzling Diamonds on it.


I've been working in the hayfield, leaving the house at 9:00 a.m. and getting back home around 8:00 p.m. This morning I got to stay home, but will need to take dinner to the field. I'll do my best to get some other things posted. I have another bridal shower gift to make by Sunday so I will need to get that going pretty soon. It gives me something to think about on the tractor. Hope everyone is staying cool. There sure has been several hot days lately. Sounds like we might have a little break coming soon. Take care!
Sunday, July 1, 2012
July Stampin' Up Promotion
Thought I'd share the Stampin' Up promotion for July with you. If you would like to order anytime during the month of July and reach $50, you might consider getting this . . .
$5 Stamp set: Reason to Smile
There are plenty of reasons to smile in July with Stampin' Up!'s Reason to Smile set - only $5 when you spend $50.
Promotion Details:
- Dates: July 1 - 31, 2012
- Spend $50 on any current Stampin' Up! products to get the exclusive Reason to Smile Set for just $5.
- Orders may be placed on any order type (customer, workshop guest or online)
- There is a limit of one (1) set per customer.
- You will not be
automatically prompted to enter the $5 Item Number for a qualifying
purchase. So be sure to enter one of these item numbers after your
order reaches $50 or more:
- Wood Mount 131274
- Clear Mount 131275
- Valued up to $20.95
- The Reason to Smile Set is exclusive to this promotion and will not be available after July 31, 2012.
- Deadline: Tuesday, July 31, 2012; 11:50 PM (MT)
Saturday, June 30, 2012
Cheers!
Tonight we are invited to a birthday party for a young man of 51. I had seen this Cheers card made by Tami White and knew I had to try it. It will work perfect for Jim's birthday card.
Here are some of the measurements . . .
-the white part of the mug measures 3 x 3 3/4, round the bottom two corners
-the So Saffron strips measure 3 x 7/8, round the bottom corners on all three pieces
-sponge the mug white piece and the So Saffron pieces with So Saffron ink
-to make the handle use the 1 3/4 in. punch first and then go in a little further using the 2 1/2 in. punch
-the froth is made up of (3)-1 1/4" circles, (3)-1" circles, (1)-3/4" circle, and (3)-1/2" circles
-sponge So Saffron around all of the circles
-the card base is white
-used Soft Suede and ran it through the lattice embossing folder for the background
-used my cricut to cut out the words Cheers! using soft suede card stock
(there is a Cheers! stamp on pg. 36 in the Happy Hour stamp set)
Hope you enjoy taking a look.
 I searched the Internet and found some funny card sayings so printed this off for the inside part of the card before making the card.

Here are some of the measurements . . .
-the white part of the mug measures 3 x 3 3/4, round the bottom two corners
-the So Saffron strips measure 3 x 7/8, round the bottom corners on all three pieces
-sponge the mug white piece and the So Saffron pieces with So Saffron ink
-to make the handle use the 1 3/4 in. punch first and then go in a little further using the 2 1/2 in. punch
-the froth is made up of (3)-1 1/4" circles, (3)-1" circles, (1)-3/4" circle, and (3)-1/2" circles
-sponge So Saffron around all of the circles
-the card base is white
-used Soft Suede and ran it through the lattice embossing folder for the background
-used my cricut to cut out the words Cheers! using soft suede card stock
(there is a Cheers! stamp on pg. 36 in the Happy Hour stamp set)
Hope you enjoy taking a look.


Friday, June 29, 2012
Clear Mount Cling Foam
Okay, so could you tell I was excited about the tag swaps? I've calmed down some, so today I want to share what I was going to share with you yesterday. I've been wanting to take a wheel apart and using the Clear Mount Cling Foam (pg 7) and make it into a stamp. I bought the Viola's lace wheel to give it a try. Here are a few pictures to help explain . . .
On the wheel, there is a seam where the image starts and stops. I cut at that seam and the rubber pulls off of the wheel very easily. The sticky stayed on the wheel so I didn't have to clean it off the rubber. I bought the "I" block that measures 5 7/8" long so that I could use it to stamp the new image. After trimming the rubber part the way I wanted (it was going to be too long to fit on the block, but it is long enough to cover the length of a 5 1/2" card) so I cut off about an inch of the rubber.
 I cut a piece of the Clear Mount Cling Foam that would fit the rubber and peeled the paper off of the sticky side. I added the rubber to the sticky side and then trimmed any of the cling foam away that wasn't covered by the rubber.
 I peeled the paper off of the other side which reveals the foam that will adhere to the clear block, just like any other clear stamp that you can buy.
 I stuck it to the clear block.
 Here is a card that I made. It is so easy to get the lace straight compared to if I wanted to wheel the lace on the card. It almost looks like real lace. I'm going to have to try and emboss the lace and see what that looks like. I also used the Papillon Potpourri butterfly, the Everything Eleanor flower designs, Trust God stamp set for the words, and the largest die cut from the Delicate Doilies Sizzlits L.
 Maybe you will want to consider taking apart a wheel. I was very satisfied with how mine turned out. If you have any questions, just email me and I'd be glad to help you out.
On the wheel, there is a seam where the image starts and stops. I cut at that seam and the rubber pulls off of the wheel very easily. The sticky stayed on the wheel so I didn't have to clean it off the rubber. I bought the "I" block that measures 5 7/8" long so that I could use it to stamp the new image. After trimming the rubber part the way I wanted (it was going to be too long to fit on the block, but it is long enough to cover the length of a 5 1/2" card) so I cut off about an inch of the rubber.


Thursday, June 28, 2012
Tag Swaps have arrived!
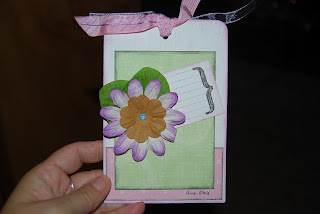
I have a card to share with you, but that will have to wait until tomorrow. I was so excited when the mail came yesterday. I had joined a tag swap back in April, I believe, with Laura Denison. We were to make eight tags (all the same) showing our rendition of Shabby Chic. You've seen my pull tag with the doily and blue, satin flower shown a couple times in my blog, but anyway, I received eight beautiful tags in return for my tags, in the mail. I have to show you them. I have no idea what I am going to do with them, but the detail on these guys are wonderful. If you have any suggestions, you can let me know. I want to display them somehow because there is so much inspiration and creativity involved that some very talented ladies put into making them. Let me know what you think . . .




Wednesday, June 27, 2012
Flip Card
I enjoyed seeing the ladies in Ainsworth for stamp club last night. We made the Elements of Style card that we made at the Chambers stamp club last week and then a flip card. While in Burwell last Saturday, Loretta's shoebox card was a flip card. Thanks Loretta for the idea! I enjoyed making it so decided that would be the card to share with the Ainsworth group. I think they enjoyed seeing how easy the process went to get the flip part of the card.
Here are the two samples I made . . . I'm just loving the Trust God word stamp set. It seems like it is the only one I've used for words since I got the set.

 The cutting of the Labels Collection edgelit is what makes the card. The Big Shot sandwich is the platform, a clear cutting plate, the card stock, the edgelit, and then the other clear cutting plate. The first photo shows how to just cut the larger portion of the edgelit. The clear cutting plate needs to be right on the 2 3/4 inch score line so only that part will cut and not the whole edgelit. Leave the edgelit attached to the card stock and switch the card stock around to cut the other smaller edge. Again, remember to line up the clear cutting plate at the 3 3/4 inch score line. Just email me and I can send you the complete instructions that I share with the stamp club, if you want.

 Here are a few more photos to help you see what I've done.

 You have the cut on the ends and not through the inch in the middle of the card.
 Crease the left part of the card as a mountain fold (at the 2 3/4 in. score line) and then a valley fold (at the 3 3/4 in score line). The card will flip open and shut. Pretty cool!
 I added a piece of white cardstock that was cut out using the same edgelit for the message on the inside of the card. It also hides the score lines.
 These are so much fun to make. Enjoy!
Here are the two samples I made . . . I'm just loving the Trust God word stamp set. It seems like it is the only one I've used for words since I got the set.


Subscribe to:
Posts (Atom)